
What do you do on the bus?
On your way to or from work, it’s been a busy day – or it’s about to be. Your stop won’t be close for a while, at least not while the traffic has anything to say about it. And you have so much to do – work and otherwise – but you barely ever have the time to do it.
When do you refuel your soul?
For me, it’s when I’m on my morning bus rides to work, and it’s all on my phone, on the devotional Bible app.
The opening interface is pretty simple, there’s a side menu you can access by tapping on the three dashes at the top right corner, but you’ll barely ever need that. To the top right is a search icon, that’s for all those times you have a scripture in your head but can’t really put your finger on where it’s from. This is for all those “did Jesus really say that?” moments, or just when you need to find other places where a particular word was mentioned in scripture.
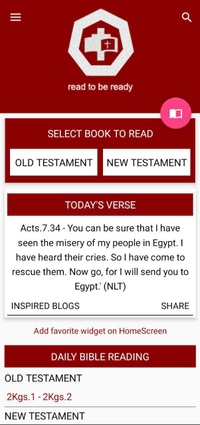
Positioned at the center are the three buttons you’d really be tapping most times you open the app. The section is a rectangle with the text “SELECT BOOK TO READ” and a pink circular button popping out at the top right of the section – that’s for picking up where you left off. It remembers what verse you were on the last time you opened the app and puts you right back there. The other buttons in this section direct you to either the old, or New Testament. After clicking on one or the other, you’re prompted to pick a book, then a chapter, you get the gist.
Not sure what to read? Look a little further down and you’d find the next section “today’s verse” and there’s already a verse pasted there. feeling edified already? Scroll down a little and you’ll find the section for ‘daily bible reading’ with chapters picked out from the Old Testament, New Testament, and the ‘psalms & proverbs’ even further down are devotionals, but hey, we don’t want to get overwhelmed or anything, so sola scriptura.
Have you gotten to a verse? Well, a chapter to be exact, as the whole chapter is displayed when you get into the scripture. Each verse offers you to switch individually from the amplified, king James, message and other translations – or all of them – but they’ll be displayed in your default version to begin with (I’ll show you how to change that in a bit) There are three dots at the top right of each verse that pulls out a menu offering you to copy the verse, highlight it, write your in-app notes for it or even share it.
At the bottom of the screen there are buttons that let you move to other verses in the same chapter or other chapters in the book. Swipe right and there are more buttons to listen to the audio version, jump to the old or New Testament to pick out a new book, see other scriptures you recently read, go forward or backward one chapter, or highlight a verse.
Alright, look to the top of the screen, there’s a button to go back to the home screen, don’t click that, look further right, there are three buttons. First one looks like a map marker, that lets you locate another verse, from book down, the books are organized as in the canon, but also alphabetically. The next button is a search button again, so you can still search for another verse, really handy to find other places where a particular term was used. The last button is shaped like a wrench, and those are your settings. Remember when I said I’d show you how to change the default translation? Well, here it is. Clicking the icon takes you to a page called “User preferences” the first thing on the list is “Bible Versions” which lets you change the preferred translations for reading and listening. There are other settings you can change in this list like the fonts and color scheme of the app, or the voice of the audio reading and the app notifications.
But your bus stop is finally just up ahead, but now you start – or end – your days with a word from God to warm your heart and refuel your soul, right on your phone.
Loading comments...